Smart-Lightboard Vs Lightboard
The fundamental difference is that the Smart-Lightboard is digital and the ‘traditional’ or ‘classic’
Lightboard is an analogue tool.
A Smart-Lightboard uses a new technology which integrates a digital ’layer’ over the glass transforming the surface into a large transparent touch screen. Connect via USB to your computer and use your preferred application (e.g. PowerPoint) to write digitally, annotate, display, and interact with images.
Note, not all applications provide the same level of multi-touch functionality. Please see section
below: What applications can I use?
In some use cases the traditional lightboard may be a more convenient option. Since you only require the lightboard and a camera to get going (and some pens), it’s very simple to get started.
For more extensive use cases, including complex imagery, and to deliver a richer interactive experience, the Smart-Lightboard is generally the preferred option.
Please also review: Smart-Lightboard Vs Lightboard.
Specifications
Specifications
The specifications for the Smart-Lightboard can be found here:
LGE-S46 – 46“ Smart-Lightboard System
LGE-S70 – 70“ Smart-Lightboard System
If you require more information about these products or any of the components, please contact: info@learningglass.eu
Equipment & Setup
What equipment does it come with?
LGE-S46 – 46“ Smart-Lightboard System
The S46 comes as a standalone unit.
This model provides a 46” working surface (canvas) with a lightweight, mobile design. Ideal for quick setup in a classroom or small office.
It comes with a stylus for the touch screen, tools to help assemble the unit, calibration software for Windows computers and all relevant power adapters and cables (power cables, HDMI cable etc.)
With the S46, you have the option to purchase the projector from us or to source your own. For guidelines on projector specifications see section: What projector should I use?
LGE-S70 – 70“ Smart-Lightboard System
The 70” comes as a standalone unit.
This model is typically deployed in a studio environment where in-house expertise is available to set up the Smart-Lightboard and to optimise camera and projector settings to achieve a high-quality output.
It comes with a stylus for the touch screen, tools to help assemble the unit, calibration software for Windows computers and all relevant power adapters and cables (power cables, HDMI cable etc.)
With the S70, you have the option to purchase the projector from us or to source your own. For guidelines on projector specifications see section: What projector should I use?
Our team is also available for remote and onsite support if needed.
How much space do I need?
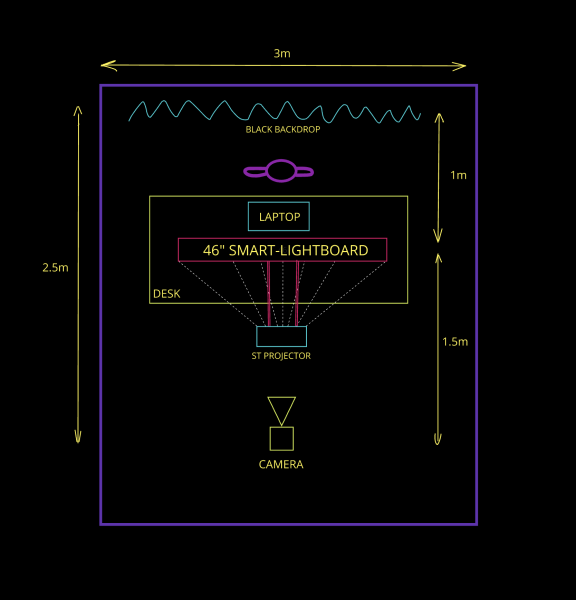
For the S46 we recommend a minimum of 3m x 2.5m. See diagram.
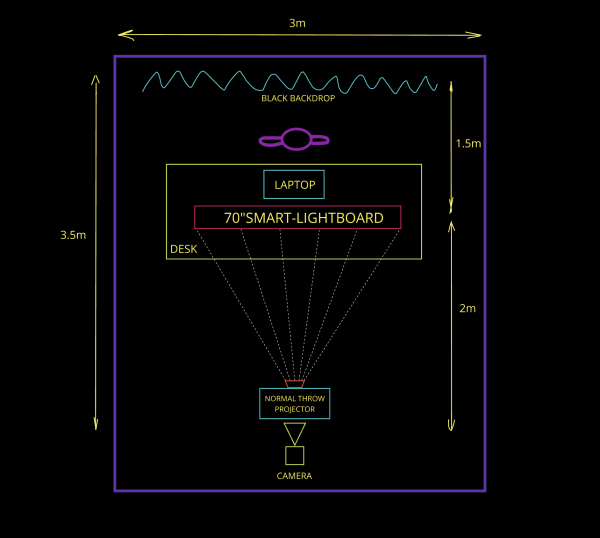
For the S70 we recommend a minimum of 3m x 3m. See diagram.
What camera should I use?
For both S46 and S70, we would recommend a professional grade camera such as advanced camcorders, or large sensor DSLR’s. Contact us for further information.
What projector should I use?
Recommended Projector Specifications for use with LGE-S46 & LGE-S70 Smart-Lightboard™
Standard throw projectors:
- Resolution 1080p Full HD (1920×1080)
- Minimum 3000 lumens (lm)
- Contrast ratio 300,000:1
- Native aspect ratio 16:9
- Throw Ratio: approximately 1.5:1. This is variable and will depend on your setup (see below)
- Keystone Correction Vertical +/- 30° (see below)
- Horizontal Flip option: Remote control option to flip the image 180°
- AV Mute Function (ability to temporarily switch off/on the projector)
Calculating Projector Throw Ratio and Distance
Consider the setup of your Smart-Lightboard studio. How far should you position the projector from the screen? This will depend on the throw ratio of your projector, the width of the screen, and the angle of the projector. Throw ratio specifications are based on horizontal distances and in the case of the Smart-Lightboard the projector will be placed below the screen at an angle, not horizontal. The standard calculation for throw ratio is as follows:
Throw ratio = Projection Distance ÷ Image Width (active projection area width)
If we therefore calculate the throw ratio required using the shortest distance from the screen to the projector, which is the distance from the lower part of the screen. For example:

Since the distance (at the lower angle) is 2271mm, and the image width is 1512mm, we can deduce the throw ratio is 1.5:1, with a projection angle of approximately 22.4°.
Keystone Correction
When the projector is at an angle I.e. not 100% perpendicular to the screen the image will be ‘stretched’ slightly, as the distance from the projector to the top and bottom of the screen are different. Vertical Keystone Correction will diagonally manipulate the image to form a rectangle and eliminate the distortion.
We can also supply a high-quality projector if needed.
What microphone should I use?
This really depends on your set up and preference. For a professional studio setup we would suggest radio lapel mics or a good quality boom mic positioned above the presenter. You can record straight to the camera (from the mics) or via a separate audio mixer. Lapel mics may be more suitable if filming with two presenters together.
Is the Smart-Lightboard height adjustable?
The product has a fixed height and has been designed this way to improve stability. Whether the user is seated or standing we recommend a motorised, height adjustable table in all use cases. This will simply make life easier, as users can adjust to a height that works for them.
Please note: every time the height of the Smart-Lightboard changes, it is necessary to adjust the projector angle and re-calibrate the touch screen.
What background should I use?
We would recommend a black background, approximately 3 metres wide. Black reflects the least amount of light and also provides the best contrast against the vivid colours and multi-media images on the Smart-Lightboard.
Is there anything else I need?
You will require a camera, projector and a hardware device or software application for ‘flipping’ the image horizontally. We’ve covered camera and projector in other sections. For flipping the image, see section: User guidelines – How do I ‘flip’ the image?
User Guidelines & Tips
How do I 'flip' the image?
There are a few different ways to flip the image, but first let’s consider the perspective of both presenter and audience.
The presenter sees all the elements on the screen in front of them. These are projected from the opposite side by the projector on to the nano-optic surface. For the presenter, the image appears back-to-front, and so we need to change the horizontal view setting on the projector by 180°.
From the camera and audience perspective the image now appears back-to-front, therefore we need to ‘flip’ the image horizontally. There are a few ways to do this:
Camera – some cameras provide this feature. Check with our support team if you are unsure and we’ll try to verify if your camera has this feature.
Hardware – the most popular hardware device used for flipping the image is known as a Decimator and connects via HDMI to your camera and computer. You can find more information about the decimator here.
Software – you can use an application such as OBS that includes this feature. OBS will likely be familiar to users of traditional lightboards and can also be used to record your video content.
Post-Production – if you’re recording your content (I.e. not Live streaming), you will be able to flip the image in post-production using any industry standard editing tools such as Adobe Premiere, Final Cut or Davinci Resolve.
If your camera does not support horizontal flip, we would generally recommend using the decimator over a software solution.
How do I calibrate the PCT (Touch Screen)?
Our products are supplied with an integrated Projected Capacitive Touch screen with multi-touch control. Also supplied is the calibration software that runs on Windows computers. Please note that Apple Mac OS does not natively support multi-touch devices.
The calibration process takes a few minutes to run and once complete does not need to be repeated unless the projector position is moved.
What applications can I use?
In a nutshell, any application that supports touch control and that also allows you to set your background colour to black in presentation mode.
With touch control, check that your application allows touch-control and annotations in presenter mode. This is not the case with all applications. PowerPoint, for example, does support touch control, and annotations and generally works well with the Smart-Lightboard.
There are far too many applications in the market for us to evaluate each one, however, if you have a specific requirement, please get in touch and we can test your use case.
What do I use to write on the board?
Think of the Smart-Lightboard surface as a huge touchscreen. You interact with it by using your fingers or stylus which is supplied with the product. The capacitive touch surface detects the exact position of your finger (or stylus) and so you can draw and annotate just like any touch screen or touch pad device.
Note: do not use anything that could scratch or damage the surface of the glass. Never use a pen or marker to write on the board.
Do I need to use a special stylus?
Every Smart-Lightboard is shipped with a specific stylus known as a capacitive stylus. They have a tip made of conductive foam, that mimics the electrical properties of your fingertip.
How do I clean the touch surface of the Smart-Lightboard?
Unlike a traditional Lightboard there is no physical ink being applied to the glass. There will be the usual accumulation of dust over time as well as finger marks or smudges (if users choose this option to write rather than the stylus).
Cleaning a Projected Capacitive Touch (PCT) screen is quite straightforward. Here are the steps you can follow:
1. Turn Off the Device: Ensure the device is powered down to avoid any accidental inputs or damage.
2. Use a Soft, Lint-Free Cloth: A microfiber cloth is ideal. Avoid using paper towels or abrasive materials that could scratch the screen.
3. Dampen the Cloth: Lightly dampen the cloth with water or a mixture of water and a small amount of mild soap. Avoid spraying liquid directly onto the screen.
4. Wipe the Screen Gently: Use the damp cloth to wipe the screen in a circular motion. Be gentle to avoid applying too much pressure.
5. Dry the Screen: Use a dry part of the cloth to remove any remaining moisture.
Avoid using harsh chemicals, alcohol-based cleaners, or abrasive pads, as these can damage the screen’s coating and functionality
How do I clean the Nano Optic side of the board?
Cleaning a nano optic projection screen requires some care to avoid damaging the delicate surface. Here are some tips to help you keep it in top condition:
1. Use Compressed Air: Gently blow off any loose dust or particles with compressed air. This helps prevent scratching the screen when you wipe it.
2. Soft, Lint-Free Cloth: Use a microfiber cloth to gently dust the screen. Avoid using paper towels or rough cloths that could scratch the surface.
3. Mild Cleaning Solution: If there are smudges or fingerprints, use a mild soap solution. Mix a small amount of dish soap with warm water. Dampen the cloth with this solution and gently blot the screen. Avoid rubbing or scrubbing.
4. Distilled Water: For a final wipe, use a cloth dampened with distilled water to remove any soap residue. This helps prevent streaks and spots.
5. Dry the Screen: Use a dry microfiber cloth to gently blot the screen dry. Make sure no moisture is left on the screen.
Avoid using harsh chemicals, alcohol-based cleaners, or abrasive pads, as these can damage the screen’s coating and functionality.
Please contact us for specific instructions if you are concerned about how to clean your product.
Please note: Any physical damage is excluded from our warranty policy.
User Experience
Does the light from the projector affect the usability?
The projector is positioned at an acute angle below the Smart-Lightboard. The light source is not visible within the human’s ‘Central Vision’ area and appears only in the periphery. As such, it does not cause any discomfort for users.
How is the experience of writing? Does it feel natural?
It’s really like writing on any advanced touch screen. The capacitive touch technology delivers high accuracy and fast response times ensuring precise touch detection, smooth gesture recognition and a more natural writing experience.
How can I Live Stream?
When preparing for a live stream it is important to ensure the Smart-Lightboard and elements including projector, camera, IR frame are all setup and tested to ensure a smooth uninterrupted experience. Once your test is complete, it’s a simple case of connecting your camera to your streaming platform such as Zoom or Teams. Remember, you will need to be able to ‘flip’ the image horizontally. See section How do I ‘flip’ the image?
Tip: when switching between applications on a live stream, use the ‘AV Mute’ option on the projector. This will pause the projection temporarily while you switch application on your computer.
Do I ever have to recalibrate the Touch Screen?
Recalibration of the Projected Capacitive Touch (PCT) screen is required if you move the projector and/or Smart-Lightboard. Therefore, we encourage users to deploy their system in a controlled environment where projector position and board position are fixed.
Whatever the scenario, please know that the recalibration process is simple and easy for users to complete within a couple of minutes.